The following is a partnership between Packt Publishing and me. The idea is for me to be a channel of valuable information made by independent publishers.
This disclaimer informs readers that the views, thoughts, and opinions expressed in the text belong solely to the author.
Building and Launching a Simple Application on Minikube
In this article, you will take your first steps to building a simple application on a local minikube cluster and run it. The first thing we need to do is build a container image for our application. The simplest way to do this is to create a Dockerfile and use the docker build command. Use your favorite text editor to create a file called Dockerfile with the following content:
Dockerfile
FROM nginx:alpine
RUN echo "<h1>Hello World</h1>" > /usr/share/nginx/html/index.html
To build the application, first ensure your Docker client is pointing to the Docker instance inside the Minikube VM by running:
eval $(minikube docker-env)
Then use Docker to build the image. In this case, we are tagging the image hello, but you could use any tag you wanted:
docker build -t hello:v1 .
Kubectl has a run command that we can use to quickly get a pod running on the Kubernetes cluster. In the background, it creates a Kubernetes deployment resource that ensures that a single instance of our hellocontainer runs within a pod (we will learn more about this later):
kubectl run hello --image=hello:v1 --image-pull-policy=Never --port=80
We are setting --image-pull-policy=Never here to ensure that Kubernetes uses the local image that we just built, rather than the default of pulling the image from a remote repository, such as Docker Hub.
We can check that our container has started correctly with kubectl get:
$ kubectl get pods
NAME                     READY     STATUS    RESTARTS   AGE
hello-2033763697-9g7cm   1/1       Running   0          1m
Our hello world application was simple enough to set up, but we need some way to access it for our experiment to be considered a success. We can use the kubectl expose command to create a service pointing to the pod in the deployment that was just created:
kubectl expose deployment/hello --port=80 --type="NodePort" --name=hello
We have set the service type to NodePort in this case so that Kubernetes will expose a random port on the Minikube VM so that we can access our service easily.
When you create a service of the NodePort type, Kubernetes automatically allocates us a port number for the service to be exposed on. In a multi-node cluster, this port will be opened on every node in the cluster. Since we only have a single node, working out how to access the cluster is a little bit simpler.
First, we need to discover the IP address of the Minikube VM. Luckily, there is a simple command we can run to get this information:
minikube ip
192.168.99.100
It is more than likely that when the minikube VM started on your machine, it was allocated a different IP address from my own, so make a note of the IP address on your own machine.
Next, in order to discover the port that Kubernetes has exposed our service on, let’s use kubectl get on our service:
$ kubectl get svc/hello
NAME      CLUSTER-IP   EXTERNAL-IP   PORT(S)        AGE
hello     10.0.0.104   <nodes>       80:32286/TCP   26m
You can see, in this case, that Kubernetes has exposed port 80 on our container as port 32286 on our node.
You should now be able to construct a URL that you can visit in your browser to test out the application. In my case, it is http://192.168.99.100:32286:
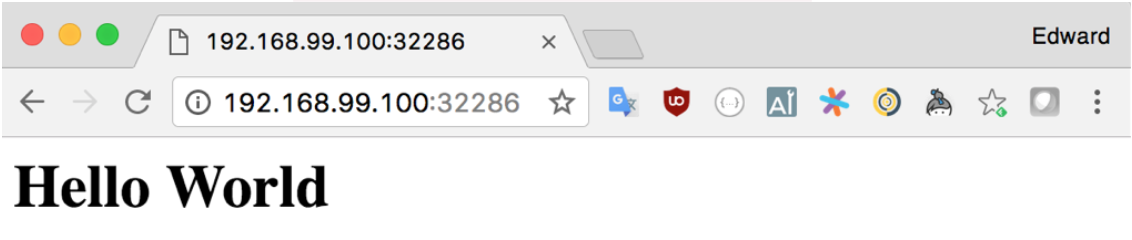
You should be able to visit your application with your web browser
What just happened?
So far, we have managed to build, run, and expose a single container on our Minikube instance. If you are used to using Docker to perform similar tasks, you might notice that although the steps we took were quite simple, there is a little more complexity in getting a simple hello world application like this up and running.
A lot of this has to do with the scope of the tool. Docker provides a simple and easy to use workflow for building and running single containers on a single machine, whereas Kubernetes is, of course, first and foremost a tool designed to manage many containers running across multiple nodes.
In order to understand some of the complexity that Kubernetes introduces, even in this simple example, we are going to explore the ways that Kubernetes is working behind the scenes to keep our application running reliably.
When we executed kubectl run, Kubernetes created a new sort of resource: a deployment. A deployment is a higher level abstraction that manages the underlying ReplicaSet on our behalf. The advantage of this is that if we want to make changes to our application, Kubernetes can manage rolling out a new configuration to our running application:
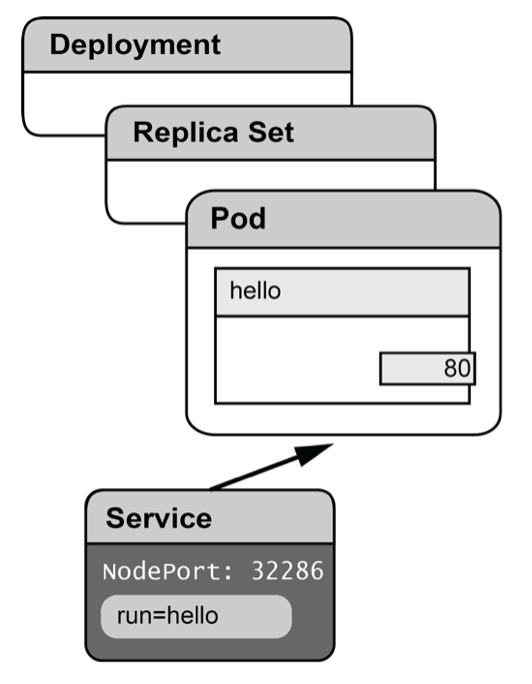
When we executed kubectl expose, Kubernetes created a service with a label selector that matched the pods under management by the deployment that we referenced.
Rolling out changes
One of the key functions of the deployment resource is to manage the roll-out of new versions of an application. Let’s look at an example of how you would do this.
First, let’s update the Dockerfile for version 2 of our Hello World application:
Dockerfile
FROM nginx:alpine
COPY index.html /usr/share/nginx/html/index.html
You may have noticed that the HTML we used for version 1 was a little incomplete, so we are using the COPY command in the Dockerfile to copy an index.html file into our container image.
Use your text editor to create an index.html file that will be visually distinguishable from version 1. I took the opportunity to add a proper DOCTYPE, and, of course, to use CSS to re-implement the sadly now defunct blink tag! Since this isn’t a book about web design, feel free to make whatever changes you want:
index.html
<!DOCTYPE html>
<html>
  <head>
    <style>
      blink { animation: blink 1s steps(1) infinite; }
      @keyframes blink { 50% { color: transparent; } }
    </style>
    <title>Hello World</title>
  </head>
  <body>
    <h1>Hello <blink>1994</blink></h1>
  </body>
</html>
Next, use Docker to build your version 2 image:
docker build -t hello:v2 .
Now we can use kubectl to update the deployment resource to use the new image:
kubectl set image deployment/hello hello=hello:v2
Wait a few moments for Kubernetes to launch the new pod, and then refresh your browser; you should see your changes.
When we update a deployment, behind the scenes Kubernetes creates a new replica set with the new configuration and handles rolling the new version out. Kubernetes also keeps track of the different configurations you have deployed. This also gives you the ability to roll a deployment back if required:
$ kubectl rollout undo deployment/hello
deployment "hello" rolled back
Resilience and scaling
Being able to provide services that are resilient to errors and issues in the underlying infrastructure is one of the key reasons why we might want to use Kubernetes to deploy our containerized applications.
We are going to experiment with our Hello World deployment to discover how Kubernetes can deal with problems like these.
The first experiment is to see what happens when we deliberately remove the pod where our hello container is running.
To do this, we need to find the name of this pod, which we can do with the kubectl get command:
$ kubectl get pods
NAME                     READY     STATUS    RESTARTS   AGE
hello-2473888519-jc6km   1/1       Running   0          7m
On our Minikube cluster, we currently only have one pod running from the one deployment that we have created so far. Once you start to deploy more applications, the output from commands such as kubectl get can get lengthier. We can use the -l flag to pass a label selector to filter down the results. In this case, we would use kubectl get pods -l run=hello to show just the pods where the run label is set to hello.
Then we can use the kubectl delete command to remove the resource. Deleting a pod also terminates the processes running inside of the constituent containers, effectively cleaning up the Docker environment on our node:
$ kubectl delete pod/hello-2473888519-jc6km
pod "hello-2473888519-jc6km" delete
If we then rerun the get pods command, you should notice that the pod we deleted has been replaced by a new one with a new name:
$ kubectl get pod
NAME                     READY     STATUS    RESTARTS   AGE
hello-2473888519-1d69q   1/1       Running   0          8s
In Kubernetes, we can use replica sets (and deployments) to ensure that pod instances continue to run in our cluster despite unexpected events, be they a failed server, or a fat-fingered admin deleting our pod (as has happened in this case).
You should begin to understand as part of this exercise that a pod is an ephemeral entity. When it is deleted or the node it is running on fails, it is gone forever. Kubernetes ensures that the missing pod is replaced by another, created in its image from the same template.
This means that any state that is stored on the local filesystem or in memory, the identity of the pod itself is also lost when a pod inevitably fails and is replaced.
This makes the pods well-suited to some kinds of workload where it is not necessary for a state to be stored locally across runs, such as web applications and most batch jobs. If you are building new applications that you intend to deploy to Kubernetes, you will make them easier to manage by delegating the storage of state to an external store, such as a database or a service like Amazon S3.
One problem you may have noticed when we were testing the abilities of Kubernetes to replace a pod that was removed is that, for a short time, our service became unavailable. For a simple example service running on a single node cluster such as this, perhaps this is not the end of the world. But we do really need a way for our applications to run in a way that minimizes even momentary downtime.
The answer is, of course, to ask Kubernetes to run multiple pin stances for our application, so even if one is lost, a second can take the slack:
$ kubectl scale deployment/hello --replicas=2
deployment "hello" scaled
If we now check the pods running, we can see a second hello pod has joined the party:
$ kubectl get pods
NAME                     READY     STATUS    RESTARTS   AGE
hello-2473888519-10p63   1/1       Running   0          1m
hello-2473888519-1d69q   1/1       Running   0          25m
Using the dashboard
The Kubernetes dashboard is a web application that runs within your Kubernetes cluster and offers an alternative, more graphical solution for exploring and monitoring your cluster.
Minikube automatically installs the dashboard and provides a command that will open it in your web browser:
$ minikube dashboard
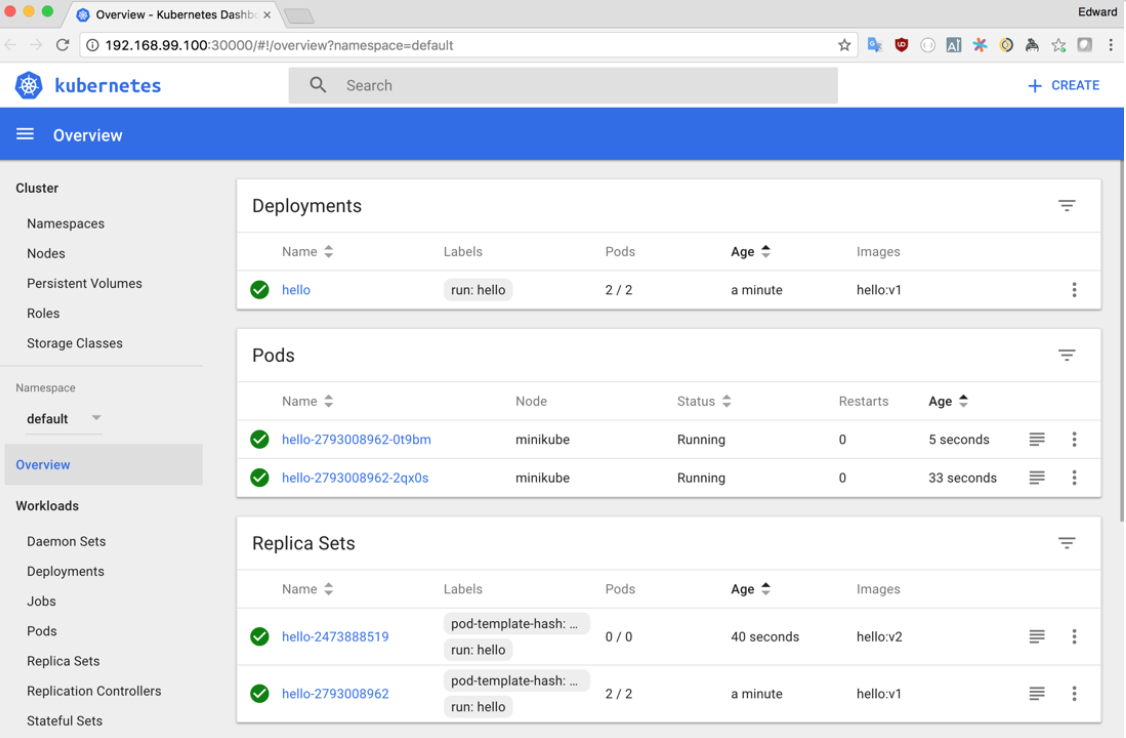
The dashboard interface is very easy to use, and you should begin to notice more than a few similarities with the way that kubectl works, since they both allow you to interact with the same underlying API.
The Navigation bar on the left of the screen gives access to screens showing a list of resources of a particular kind. This is similar to the functionality provided by the kubectl get command:
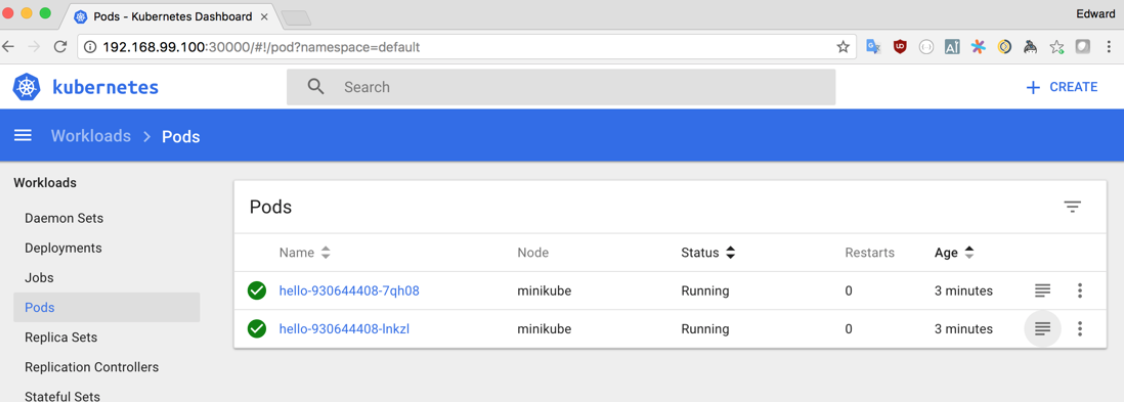
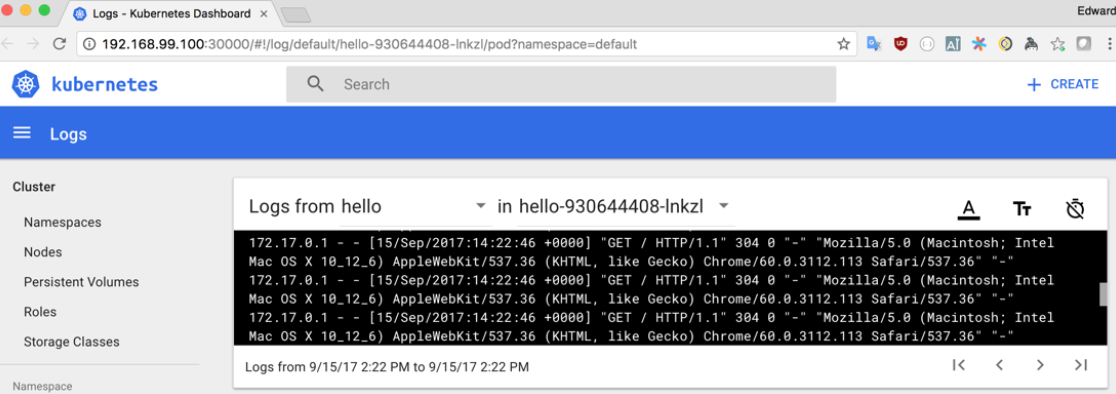
In this view, we can click on the icon that looks like a stack of papers in order to open a log viewer to view the logs captured from standard out in each container in the pod:
Other resources have other options appropriate to their function. For example, Deployments and Replica Sets have a dialog to scale the number of pods up or down.
By clicking on the name of a particular resource, we get a view that shows similar information to kubectl describe:
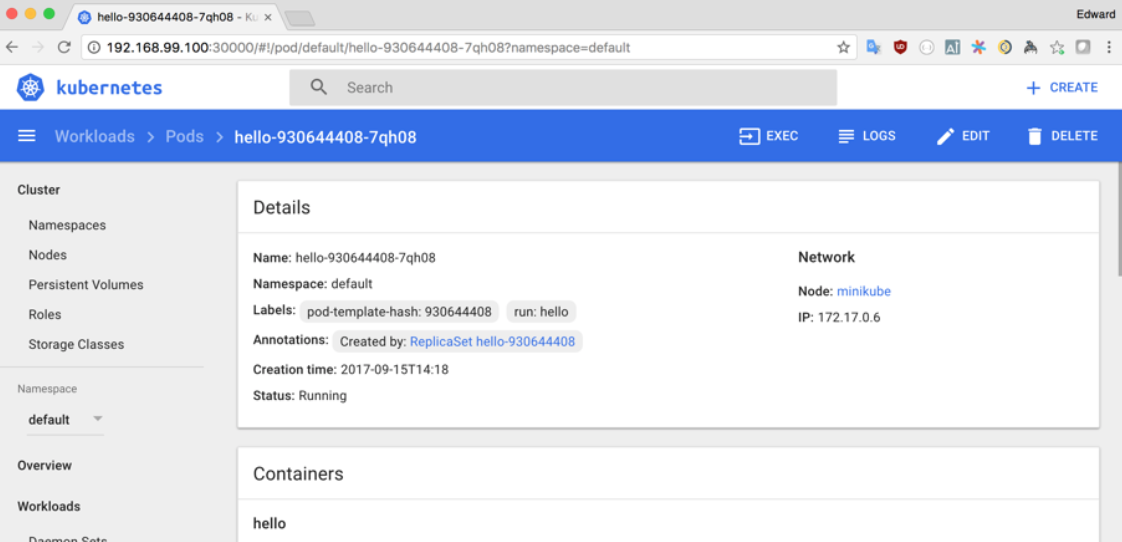
The detail screen provides us quite a lot of information about pods or other resources in Kubernetes:
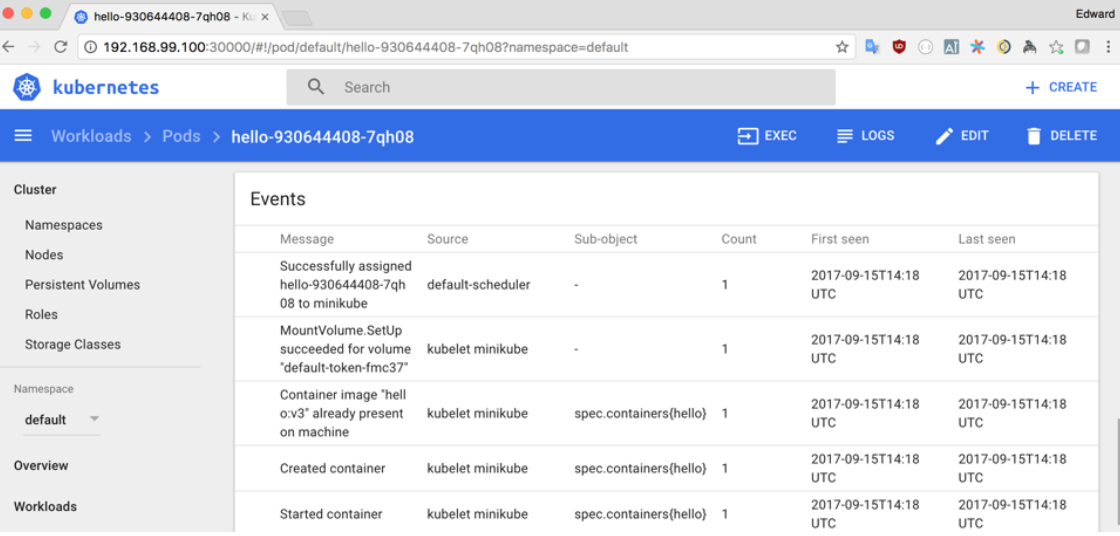
As well as an overview of the configuration and settings for the resources, if you scroll to the bottom of the page, you should be able to see a feed of events. This is very useful if you are trying to debug issues and will highlight any errors or problems with a running resource.
For pods, we get a number of other options for managing and inspecting the container. For example, opening an in-browser terminal by clicking the exec button:
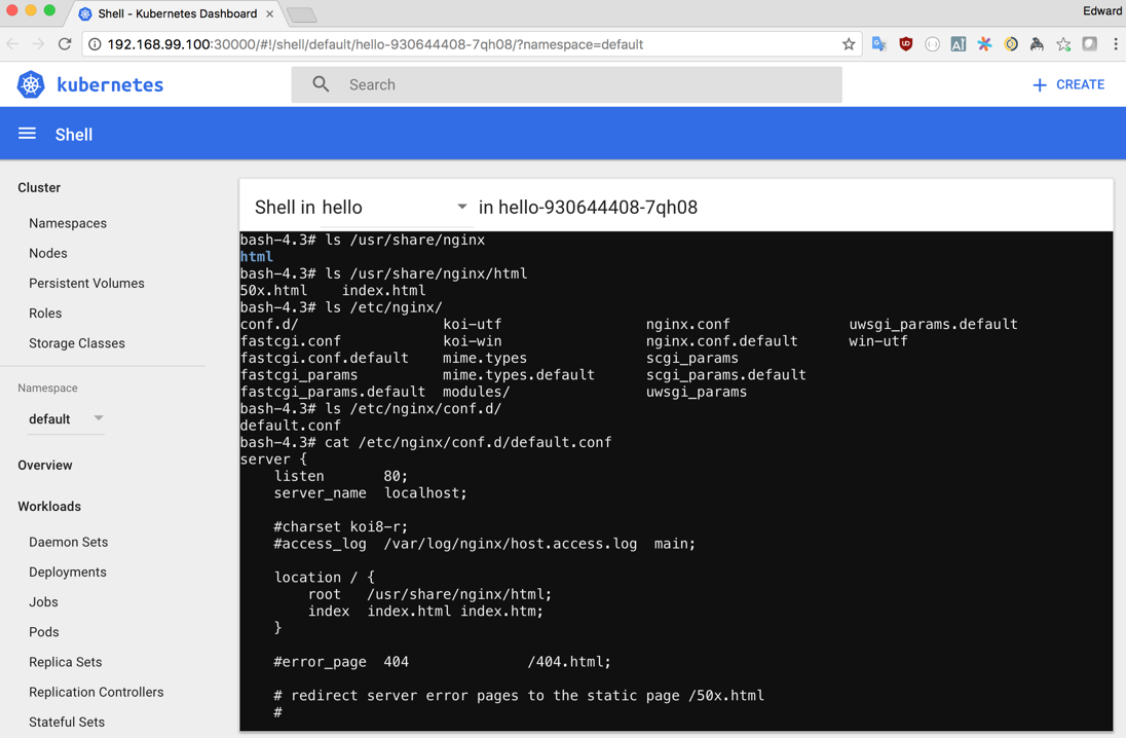
Currently, for this feature to work properly, your container needs to have /bin/bash available. This might change in future versions of the dashboard, but for now, to make this work add RUN apk add –no-cache bash to your Dockerfile and deploy the newly built image.
Configuration as code
Throughout this chapter, we have interacted with Kubernetes by using commands provided by kubectl or the Kubernetes dashboard. In practice, I find that these tools are useful for quickly getting a container running in a cluster. When the configuration becomes more complex or I want to be able to deploy the same application to multiple environments, having a configuration file that I can submit to the cluster, and store in a version control system, is very useful. kubectl and indeed the Kubernetes dashboard, will allow us to submit YAML or JSON formatted configurations for the resources we want to create on the cluster. We are going to take another look at how we would deploy the same Hello World application using YAML-formatted files rather than commands such as kubectl run.
Note This Kubernetes configuration is often referred to as a Manifest, and the YAML-or-JSON formatted files as Manifest files.
Let’s start by removing the configuration we created with kubectl so we have a clean state to reproduce the same configuration:
$ kubectl delete deployment/hello svc/hello
deployment "hello" deletedservice "hello" deleted
Let’s define a deployment for version 1 of the hello service:
deployment.yaml
apiVersion: apps/v1
kind: Deployment
metadata:
  name: hello
spec:
  replicas: 2
  template:
    metadata:
      labels:
        app: hello
    spec:
      containers:
      - name: hello
        image: hello:v1
        ports:
        - containerPort: 80
Now we can use kubectl to submit the deployment to Kubernetes:
$kubectl apply -f deployment.yaml
deployment "hello" created
Next, let’s do the same for a service:
service.yaml
kind: Service
apiVersion: v1
metadata:
  name: hello
spec:
  selector:
    app: hello
  type: NodePort
  ports:
  - protocol: TCP
    port: 80
    targetPort: 80
Submit the definition to Kubernetes with kubectl:
$ kubectl apply -f service.yaml
service "hello" created
You can see that while we have sacrificed the speed and simplicity of just running a command to create a deployment, by explicitly specifying the resources we want to create, we gain greater control over exactly how our pods are configured, and we now have this definition in a form that we can check into version control and reliably update.
When it comes to updating a resource, we can make an edit to the file and then use the kubectl apply command to update the resource. kubectl detects that we are updating an existing resource and updates it to match our configuration. Try editing the image tag in deployment.yaml and then re submitting it to the cluster:
$ kubectl apply -f deployment.yaml
deployment "hello" configured
If we are just making changes to the resource on our local cluster, we might just want to quickly change something without having to edit the file at all. Firstly, as in our previous example, you can use kubectl set to update a property. Kubernetes doesn’t really care how we created the resource, so everything we did previously is still valid.
The other method of making a quick change is with the kubectl edit command. Assuming you have the $EDITOR environment variable set up correctly with your favorite text editor, you should be able to open YAML for a resource, edit it, and then save while kubectl seamlessly updates the resource for you.
Troubleshooting Minikube
One common problem that you might run into when trying to use Minikube is that you might not be able to access the VM because its network overlaps with another network configured on your machine. This can often happen if you are using a corporate VPN, or you connect to another network that configures routes for the 192.168.99.1/24 IP address range used by Minikube by default.
It is simple to start Minikube with an alternative CIDR to be used for the VM. You can choose any private range that you want to use; just check that it won’t overlap with other services on your local network:
$ minikube start --host-only-cidr=172.16.0.1/24
If you found this article interesting and want to learn more about Kubernetes, you can explore Kubernetes on AWS. Packed with hands-on advice, guiding the reader from the basics to fully fledged cluster administration, Kubernetes on AWS is a must-read for cloud engineers, cloud solution providers, sysadmins, site reliability engineers, and developers interested in DevOps.