The following is a partnership between Packt Publishing and me. The idea is for me to be a channel of valuable information made by independent publishers.
This disclaimer informs readers that the views, thoughts, and opinions expressed in the text belong solely to the author.
Creating a Bug-Tracking Bot Using Node.js
Learn how to create a bug tracking bot in this tutorial by Madan Bhintade, an independent Solution Architect and a developer who enjoys development on AWS, Microsoft Azure and Office 365, SharePoint Server, Angular, and Node.js.
InternetRelayChat (IRC) enables you to communicate in real time in the form of text. This chat runs on a TCP protocol in a client-server model. In this article, you’ll learn to develop an IRC bot for bug-tracking purposes. This bug-tracking bot will provide information about bugs as well as details about a particular bug.
IRC client and server
To initiate an IRC communication, you need an IRC client and a server or a network to which your client will be connected. Use a Freenode network for your client to connect to.
IRC web-based client
Use the IRC web-based client through the URL https://webchat.freenode.net/. For connecting, you need to provide Nickname: and Channels:. Here the Nickname: is provided as Madan and Channels: as #BugsChannel. This is the new channel that you will start for communication. Once connected, you will see the following screen:

With this, your IRC client is connected to the Freenode network. You can also see the username on the right-hand side @Madan and within this #BugsChannel. Anyone using this channel will be shown on the right-hand side. Now ask your bot to join this channel and network and see how it appears within the channel.
IRC bots
IRC bot is a program that connects to IRC as one of the clients and appears as one of the users in the IRC channels. These IRC bots are used to provide IRC services or to host chat-based custom implementations that will help teams to efficiently collaborate.
Creating your first IRC bot using IRC and Node.js
Start by creating a folder on your local drive, in order to store your bot program, from the Command Prompt:
mkdir ircbot

cd ircbot
Assuming that you have Node.js and npm installed, create and initialize your package.json, which will store your bot’s dependencies and definitions:
npm init
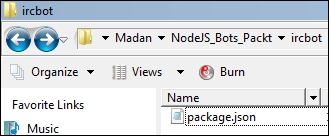
Once you have gone through the npm init options (which are very easy to follow), you’ll see something similar to this:

In your project folder, you’ll see the result, which is your package.json file:
Install the irc package from npm. This can be located at https://www.npmjs.com/package/irc. In order to install it, run this npm command.
npm install \--save irc
You should then see something similar to this:
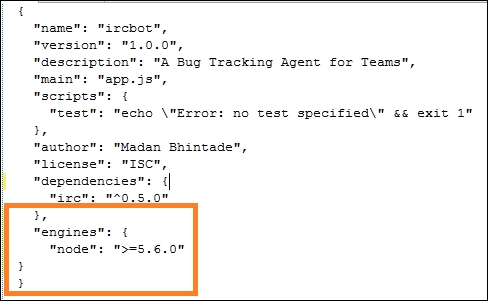
The next thing to do is update your package.json in order to include the ”engines” attribute. Open the package.json file with a text editor and update it as follows:
"engines": {
  "node": ">=5.6.0"
}
Your package.json should then look like this:
Create your app.js file, which will be the entry point to your bot, as mentioned while setting up your node package. Your app.js should look like this:
var irc = require('irc');

var client = new irc.Client('irc.freenode.net', 'BugTrackerIRCBot',
{

	autoConnect: false

	});

	client.connect(5, function(serverReply) {

	console.log("Connected!\n", serverReply);

	client.join('#BugsChannel', function(input) {

	console.log("Joined #BugsChannel");

	client.say('#BugsChannel', "Hi, there. I am an IRC Bot which track bugs or defects for your team.\n I can help you using following commands.\n BUGREPORT \n BUG # <BUG. NO>");

	});

});
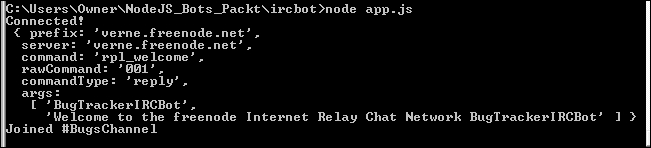
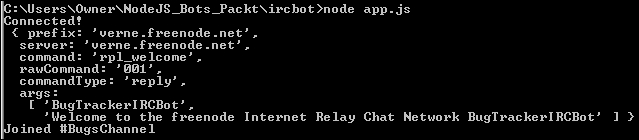
Now run your Node.js program and see how your console looks. If everything works well, your console should show your bot as being connected to the required network and also joined to the channel:
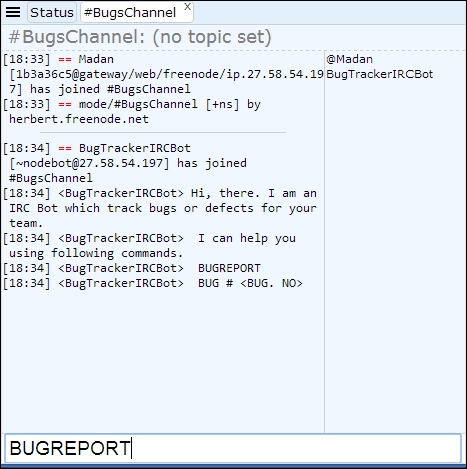
Now, if you look at #BugsChannel in your web client, you should see that your bot has joined it and also sent a welcome message:
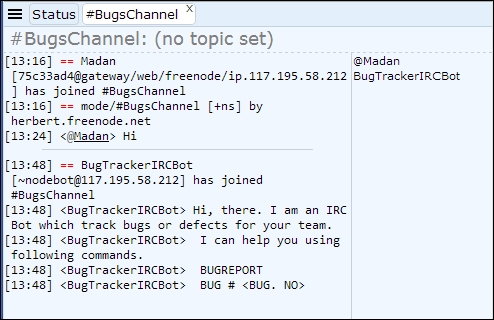
If you look at the preceding screen, your bot program has executed successfully. Your bot BugTrackerIRCBot has joined the channel #BugsChannel, and also the bot has sent an introduction message to all who are on the channel. If you look at the right side of the screen under usernames, you can see BugTrackerIRCBot below @Madan.
Code understanding of your basic bot
After seeing how your bot looks in IRC client, look at the basic code implementation from app.js. The irc library has been used with the following line:
var irc = require('irc');

Using the irc library, instantiate the client to connect to one of the
IRC networks using the following code snippet:

var client = new irc.Client('irc.freenode.net', 'BugTrackerIRCBot',
{

autoConnect: false

});
Here, you are connected to network irc.freenode.net and provided a nickname BugTrackerIRCBot. This name has been given for the bot to track and report any bugs found in the future. Now, ask the client to connect and join a specific channel using the following code snippet:
client.connect(5, function(serverReply) {

    console.log("Connected!\n", serverReply);

    client.join('#BugsChannel', function(input) {

    console.log("Joined #BugsChannel");

    client.say('#BugsChannel', "Hi, there. I am an IRC Bot which track bugs or defects for your team.\n I can help you using following commands.\n BUGREPORT \n BUG # <BUG. NO>");

    });

});
Once the client is connected, you receive a reply from the server. This reply is shown on a console. Once successfully connected, ask the bot to join a channel using the following code line:
client.join('#BugsChannel', function(input) {
Remember, #BugsChannel is what you have joined from the web client. Now, using client.join(), you can ask your bot to join the same channel. Once the bot has joined, the bot gives a welcome message in the same channel using the function client.say().
Hopefully, this has given you some basic understanding of your bot and its code implementations.
The next section will help you enhance your bot so that your teams can have an effective communication experience while chatting.
Enhancing your BugTrackerIRCBot
You can create a channel for communication; all the team members can join it and your bot will also be there. In this channel, bugs will be reported and communicated based on developers’ requests. Also, if developers need some additional information about a bug, the chatbot can help them by providing a URL from the bug-tracking system.
Here is a summary of how you can do this:
-
Enhance your basic bot program for a more conversational experience
-
Create a bug-tracking system or bug storage where bugs will be stored and tracked for developers (This article will look at DocumentDB, a NoSQL JSON-based cloud storage system, for your bug system.)
Setting up a DocumentDB for your BugTrackerIRCBot
Assuming that you already have a Microsoft Azure subscription, follow these steps to configure DocumentDB for your bot.
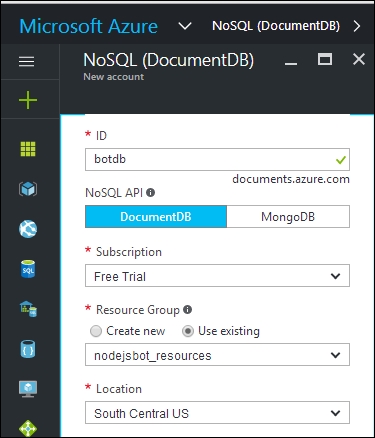
Create account ID for DocumentDB
Create a new account called botdb using the following screenshot from the Azure portal. Select NoSQL API as DocumentDB. Select an appropriate subscription and resources. Once you enter all the required information, hit the Create button at the bottom to create the new account for DocumentDB.
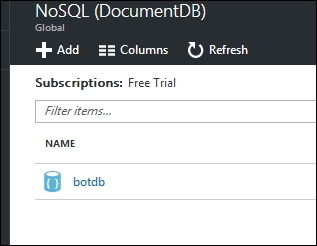
The newly created account, botdb, can be seen as follows:
Create a collection and database
Selecting the botdb account will show various menu options such as Properties, Settings, and Collections. Under this account, you need to create a collection to store the bug data. To create a new collection, click on the Add Collection option:

On clicking on the Add Collection option, the following screen will be shown on the right side of the screen. Please enter the details as shown in the following screenshot:
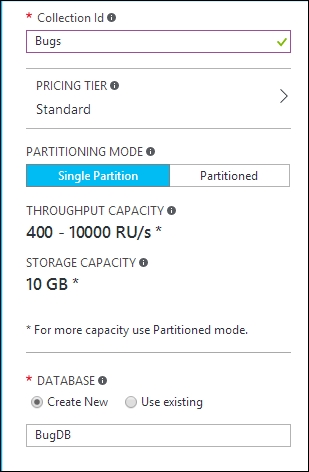
Here, you have created a new database along with your new collection, Bugs. This new database will be named BugDB. Once this database has been created, you can add other bug-related collections in future to the same database. This can be done using the option Use existing from the preceding screen. Once you have entered all the relevant data, click on OK to create the database as well as the collection. Refer to the following screenshot:
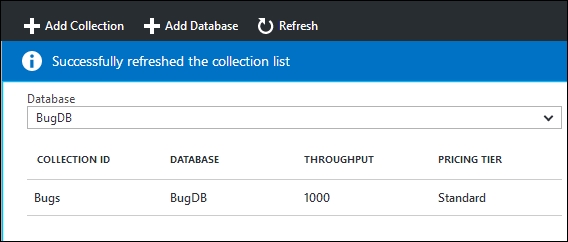
From the preceding screen, the COLLECTION ID and DATABASE shown will be used while enhancing your bot.
Create data for your BugTrackerIRCBot
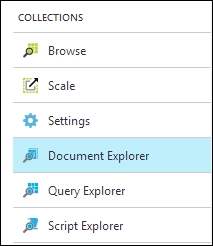
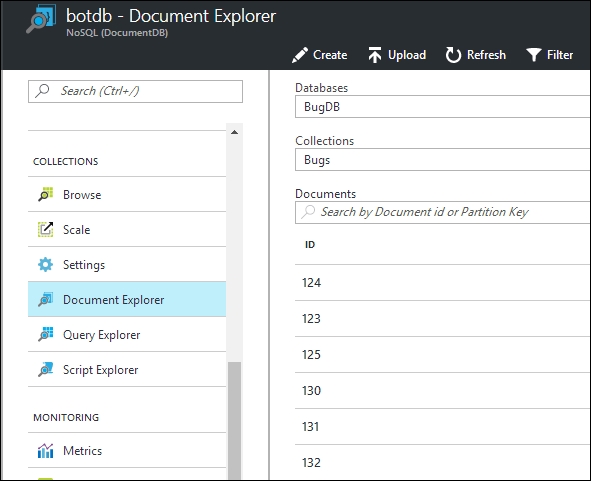
Now you have BugsDB in the bugs collection for holding all the data for bugs. Add some data to your collection. To add a data item, use the menu option Document Explorer shown in the following screenshot:
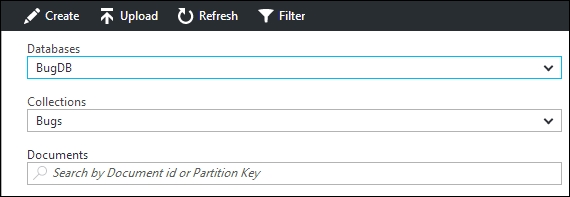
This will open up a screen showing the list of Databases and Collections created so far. Select your database of BugDB and the collection of Bugs from the available list. Refer to the following screenshot:
To create a JSON document for your bugs collection, click on the Create option. This will open up a New Document screen to enter the JSON-based data. Please enter a data item as per the following screenshot:
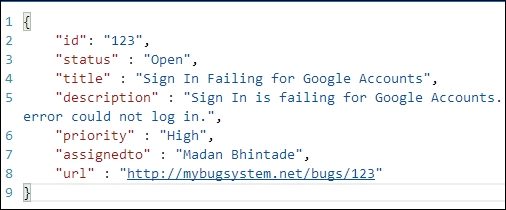
You’ll be storing id, status, title, description, priority, assignedto, and url attributes for your single bug document in the bugs collection. To save the JSON document in your collection, click on the Save button. This way you can create sample records in the bugs collection, which will later be wired up in a Node.js program. A sample list of bugs can be seen in the following screenshot:
So far, you have determined how to use DocumentDB from Microsoft Azure. Using DocumentDB, you created a new collection along with the new database to store the bug data. You have also added some sample JSON documents in the bugs collection.
Now, look at how you can wire up your DocumentDB with Node.js.
Wiring up DocumentDB and Node.js
Return to your ircbot directory and install the documentdb package from npm. This is simply Node.js SDK for Microsoft Azure DocumentDB. This is located at https://www.npmjs.com/package/documentdb. In order to install it, run this npm command:
npm install documentdb \--save
You should then see something similar to this:

Modify your app.js file so that you can access DocumentDB-based data using DocumentDB APIs.
To wire up DocumentDB with Node.js, use the following code:
var DocumentClient = require('documentdb').DocumentClient;

var host = "https://botdb.documents.azure.com:443/";

var masterKey = "<YOUR PRIMARY KEY>";

var docclient = new DocumentClient(host, {masterKey: masterKey});

docclient.readDocuments('dbs/BugDB/colls/Bugs').toArray(function (err,
docs) {

  console.log(docs.length + ' Documents found');

});
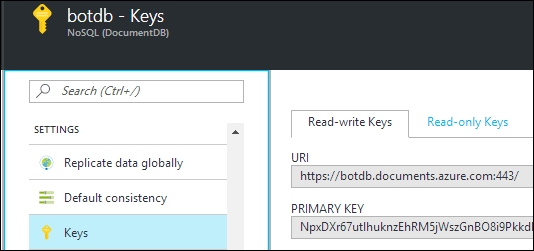
In the preceding code, you are trying to read documents from your DocumentDB. Now, to instantiate DocumentClient, you need the host and masterkey of your DocumentDB account. Refer to the following screenshot to locate host, which is only a URl and masterkey is only a PRIMARY KEY.
To read all the documents from your collection, use the following code:
docclient.readDocuments('dbs/BugDB/colls/Bugs').toArray(function (err,
docs) {

  console.log(docs.length + ' Documents found');

});
readDocuments() needs an argument of collection link. This collection link is simply the path to your collection. This is given as the following:
dbs/<Your Database>/colls/<Your Collection ID>
Your app.js now should look like this:
var irc = require('irc');

var client = new irc.Client('irc.freenode.net', 'BugTrackerIRCBot',
{

  autoConnect: false

});

client.connect(5, function(serverReply) {

    console.log("Connected!\n", serverReply);

    client.join('#BugsChannel', function(input) {

      console.log("Joined #BugsChannel");

      client.say('#BugsChannel', "Hi, there. I am an IRC bot which track bugs or defects for your team.\n I can help you using following commands.\n BUGREPORT \n BUG # <BUG. NO>");

      });

});

var DocumentClient = require('documentdb').DocumentClient;

var host = "https://botdb.documents.azure.com:443/";

var masterKey = "<YOUR PRIMARY KEY>";

var docclient = new DocumentClient(host, {masterKey: masterKey});

docclient.readDocuments('dbs/BugDB/colls/Bugs').toArray(function (err,
docs) {

  console.log(docs.length + ' Documents found');

});
Return to your ircbot directory with a Command Prompt and run your node program. Once you run this, the program will connect to your collection using Microsoft Azure DocumentDB Node.js SDK. After reading the documents, on the Command Prompt, you’ll see the number of documents read. For details, please refer the following screenshot:

Since your IRC client is connecting asynchronously, you’ll see a reply from IRC Server once received. In this case, you got the response from DocumentDB early, so you see 6 Documents found on the console.
So far, you are able to connect to DocumentDB and retrieve documents. Now, in the next and final section, you’ll wire up all of this together and enhance the conversational experience of your bot.
Wiring up all of this together
To wire up all the things together, modify your earlier app.js as follows:
var irc = require('irc');

var client = new irc.Client('irc.freenode.net', 'BugTrackerIRCBot',
{

  autoConnect: false

});

client.connect(5, function(serverReply) {

console.log("Connected!\n", serverReply);

client.join('#BugsChannel', function(input) {

    console.log("Joined #BugsChannel");

    client.say('#BugsChannel', "Hi, there. I am an IRC Bot which track bugs or defects for your team.\n I can help you using following commands.\n BUGREPORT \n BUG # <BUG. NO>");

    });

});

var DocumentClient = require('documentdb').DocumentClient;

var host = "https://botdb.documents.azure.com:443/";

var masterKey = "<PRIMARY KEY>";

var docclient = new DocumentClient(host, {masterKey: masterKey});

client.addListener('message', function (from, to, text) {

var str = text;

if (str.indexOf('BUGREPORT') === -1){

    if (str.indexOf('BUG #') === -1){

      client.say('#BugsChannel', "I could not get that!\n Send me commands like,\n BUGREPORT \n BUG # <BUG. NO>");

    }

    else {

    client.say('#BugsChannel', "So you need info about "+text);

    client.say('#BugsChannel', "Wait for a moment!");

    var t= text.substring(6,text.length);

    var temp = t.trim();

    var querySpec = {

    query: 'SELECT * FROM Bugs b WHERE b.id= @id',

    parameters: [

    {

    name: '@id',

    value: temp

    }

    ]

};

docclient.queryDocuments('dbs/BugDB/colls/Bugs',
querySpec).toArray(function (err, results) {

    if (results.length>0){

    client.say('#BugsChannel', "["+ results[0].url+"] [Status]:
    "+results[0].status+" [Title]:"+results[0].title);

    }

    else{

    client.say('#BugsChannel', 'No bugs found.');

    }

    });

    }

    }

    else{

    client.say('#BugsChannel', "So you need a Bug Report!");

    client.say('#BugsChannel', "Wait for a moment!");

    var querySpec = {

    query: 'SELECT * FROM Bugs b WHERE b.status= @status',

    parameters: [

    {

    name: '@status',

    value: 'Open'

    }

    ]

    };

    docclient.queryDocuments('dbs/BugDB/colls/Bugs',
    querySpec).toArray(function (err, results) {

    client.say('#BugsChannel','Total Open Bugs:'+results.length);

});

var querySpec = {

    query: 'SELECT * FROM Bugs b WHERE b.status= @status',

    parameters: [

    {

    name: '@status',

    value: 'Closed'

    }

    ]

};

docclient.queryDocuments('dbs/BugDB/colls/Bugs',
querySpec).toArray(function (err, results) {

    client.say('#BugsChannel','Total Closed Bugs:'+results.length);

    });

    }

});
Code understanding
Focus on how you have implemented the conversational experience and how you’ll get bug information based on that within your BugTrackerIRCBot.
client.addListener('message', function (from, to, text) {

    var str = text;

    if (str.indexOf('BUGREPORT') === -1){

    if (str.indexOf('BUG #') === -1){

    client.say('#BugsChannel', "I could not get that!\n Send me commands like,\n BUGREPORT \n BUG # <BUG. NO>");

}
In the preceding code, your IRC client has been added with a listener
that listens to all the messages within the channel. So, as your bot
joins the channel, the bot mentions which commands can be used. These
commands are BUGREPORT and BUG #
Knowing this, when your incoming message contains words like BUGREPORT and BUG #, then your bot BugTrackerIRCBot gathers information based on those commands. If the message does not match, then the bot replies with a proper message and also provides usable commands.
Assume that one of the developers is looking for the total number of defects. So, the developer enters the command BUGREPORT; then, your bot will query the DocumentDB database and get the report for open and closed bugs from your bugs collection. The code is as follows:
client.say('#BugsChannel', "So you need a Bug Report!");

client.say('#BugsChannel', "Wait for a moment!");

var querySpec = {

    query: 'SELECT * FROM Bugs b WHERE b.status= @status',

    parameters: [

    {

    name: '@status',

    value: 'Open'

    }

    ]

};

docclient.queryDocuments('dbs/BugDB/colls/Bugs',
querySpec).toArray(function (err, results) {

client.say('#BugsChannel','Total Open Bugs:'+results.length);

});
In the preceding code, once the developer’s intention of getting a report is clear, your bot replies with confirmation using the client.say() function. The bot interactively asks the developer to wait for a moment and in the meantime, queries DocumentDB using the function docclient.queryDocuments(). Once the data is received, the bot uses the client.say() function and returns the information in a chat window. In the preceding code, the bot first returns Total Open Bugs and then Total Closed Bugs.
Now you may ask why two different calls are made for Open and Closed bugs; the reason being currently, there is no native support for AGGREGATE functions in DocumentDB. You need to know only the Open and Closed numbers of bugs, so you use the docclient.queryDocuments() function twice to get the data.
BugTrackerIRCBot can also give information about individual bugs using the command BUG #. The implementation for the same can be seen in the following code snippet:
client.say('#BugsChannel', "So you need info about "+text);

client.say('#BugsChannel', "Wait for a moment!");

var t= text.substring(6,text.length);

var temp = t.trim();

var querySpec = {

query: 'SELECT * FROM Bugs b WHERE b.id= @id',

parameters: [

{

name: '@id',

value: temp

}

]

};

docclient.queryDocuments('dbs/BugDB/colls/Bugs', querySpec).toArray(function (err, results) {

    if (results.length>0){

    client.say('#BugsChannel', "["+ results[0].url+"] [Status]:
    "+results[0].status+" [Title]:"+results[0].title);

    }

    else{

    client.say('#BugsChannel', 'No bugs found.');

    }

});
When the developer gives the BUG # command while chatting, your code will extract only the bug number after the symbol #. Then, your bot will reply with bug details will be retrieved from the database. If the records are not found, your bot will reply with an appropriate message.
The variable querySpec will formulate a query with the parameter of the bug number entered by the developer in the chat window and then will be processed using the function docclient.queryDocuments(). Once the function retrieves the data for a specified bug number, your bot will formulate the following response:
client.say('#BugsChannel', '[http://mybugsystem.net/'+
results[0].id +"] [Status]: "+results[0].status+"[Title]:"+results[0].title);
To the end user or a developer, you show the URL of the bug from the bug-tracking system as well as the status of the bug and a title.
Run your bot now, and see how it interacts and provides you with a great conversational experience.
Running your enhanced BugTrackerIRCBot
Return to your ircbot directory; on the Command Prompt, run your modified app.js. Once the code has run successfully, you should see the following:
This is assuming that you are already connected to the IRC client. Now, look at your channel #BugsChannel from an IRC client. You should see your bot as follows:
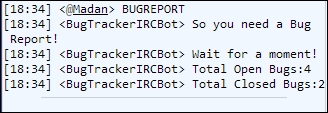
You can see that the bot has joined the channel and introduced itself with usable commands. Enter the command BUGREPORT and see what the bot replies. Here, the bot is getting the bug report, as explained earlier in the code description. The reply seen is as follows:
Now ensure your other command works as well. So, now you are interested in information about an individual bug; enter the command BUG # 125 and see what your bot replies:
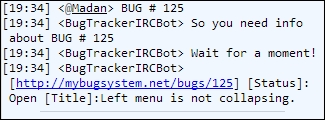
The bot replied with the URL of the bug-tracking system for a bug, and also Status and Title information.
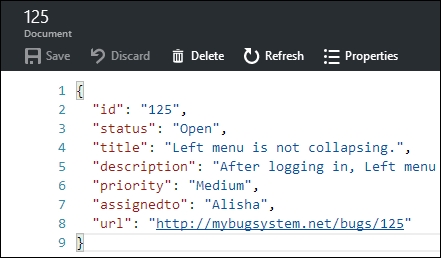
Crosscheck in DocumentDB if the bot provides the correct information. In DocumentDB, for Bug # 125, the following data can be seen:
If you enter a bug number that does not exist in DocumentDB, then the bot replies accordingly; refer to the following screenshot:
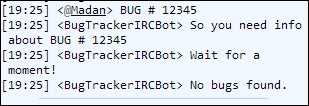
Here, BUG # 12345 was entered, and the bot searched but could not find the bug, so it responded No bugs found.
You can now extend your bot to meet your requirements. BugTrackerIRCBot can be further extended to assign bugs or even to create a new bug using appropriate commands such as ASSIGNBUG or NEWBUG.
If you found this article interesting, you can explore Building Bots with Node.js to Automate workflow and internal communication processes and provide customer service using messaging and interactive bots. This book shows you how to create work automation bots that interact with users through Slack, e-mail, Skype, Twitter, and more using Node.js.